
How Does the Knight Move in Chess? A Beginner’s Guide for Kids
Knight Moves at a Glance
A knight moves in an L shape: two squares in one direction and then one square to the side. It is the only chess piece that can jump over other pieces.
- A knight can move two squares vertically and one horizontally, or two horizontally and one vertically.
- Knights can jump over pieces of either color.
- A knight always lands on a square of the opposite color from the square where it started.
- A knight near the center of the board can reach more squares than a knight near an edge or corner.
What Makes the Knight Different?
We’ve seen every piece on the board now, except the knight. So let’s set up
the initial position (like we learned way back when) and look at it.
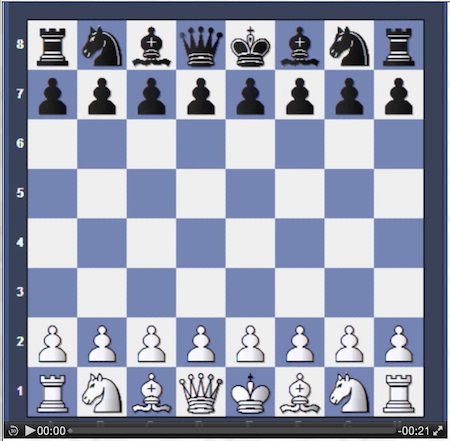
Ignoring the knights for the moment, let’s
consider this position and how the pieces move. We know from previous
examples that the pawns, kings, queens, bishops, and rooks can move (in
their own fashion) to any empty square in their path. But we also know
none of them can jump over anything that’s in their way. So white and
black both have whole rows of pawns in the way that are going to have to
move before any bishops, queens, rooks, or kings are going to be able to
move anywhere.
But do knights have this problem? Do they have to wait? No, they don’t; knights are unique in that they can jump over other pieces, either of their own color or those of your opponent’s!
How Does the Knight Move?
There are two ways to look at the way a knight moves. One or
the other will probably work for you just fine.
Method 1: The L-Shaped Move
The first way to look at the knight move might be as an
‘L’-shaped move.
| a | b | c | d | e | f | g | h | ||
| 8 | 8 | ||||||||
| 7 | 7 | ||||||||
| 6 | 6 | ||||||||
| 5 | 5 | ||||||||
| 4 | 4 | ||||||||
| 3 | 3 | ||||||||
| 2 | 2 | ||||||||
| 1 | 1 | ||||||||
| a | b | c | d | e | f | g | h |


one way of looking at it, and its how a lot of people learned.
Let’s just take a knight and drop it in the middle of an
empty board on square ‘e4’. The red dots show all of the squares to which
this knight can move from ‘e4’. Notice that they’re all dark-colored
squares. That’s because the knight sits on a light-colored square.
In this example we’re going to move the knight from ‘e4’
to the ‘f6’ square (you would write that down as ‘Nf6’).
Breaking the L Shape Into Three Steps
To get an idea of how the knight would move, we’ll take a red
marker and draw the path on the board that the knight will take to get to the
red dot on square ‘f6’, and we’ll end up with this:
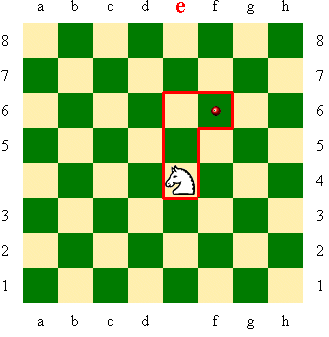
here like an upside down ‘L’.
Now let’s work it out in detail in
three steps:
| a | b | c | d | e | f | g | h | ||
| 8 | 8 | ||||||||
| 7 | 7 | ||||||||
| 6 | 6 | ||||||||
| 5 | 1 | 5 | |||||||
| 4 | |||||||||
| 3 | 3 | ||||||||
| 2 | 2 | ||||||||
| 1 | 1 | ||||||||
| a | b | c | d | f | g | h |

the knight moves forward one square. Its a third of the way there.
| a | b | c | d | e | f | g | h | ||
| 8 | 8 | ||||||||
| 7 | 7 | ||||||||
| 6 | 2 | 6 | |||||||
| 5 | 1 | 5 | |||||||
| 4 | |||||||||
| 3 | 3 | ||||||||
| 2 | 2 | ||||||||
| 1 | 1 | ||||||||
| a | b | c | d | f | g | h |
knight moves forward another square. We’re getting there. One last thing
to do.
| a | b | c | d | e | f | g | h | ||
| 8 | 8 | ||||||||
| 7 | 3 | 7 | |||||||
| 6 | 2 | 6 | |||||||
| 5 | 1 | 5 | |||||||
| 4 | |||||||||
| 3 | 3 | ||||||||
| 2 | 2 | ||||||||
| 1 | 1 | ||||||||
| a | b | c | d | f | g | h |

The knight reaches its destination on square ‘f6’, and its move is now
complete.
Now of course, knights aren’t limited to moving forward like
pawns. So let’s toss a few more knights on the board and draw some (but not all)
of the ‘L’-shaped moves for them.
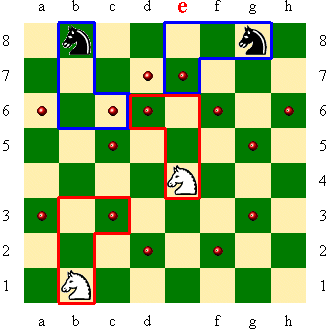
black knights’ moves are drawn with a blue marker.
Each of these knights has more than just the one drawn
move available to it. The red dots show all of the available moves. Can
you tell all of the squares to which the knights as placed here can move?
(The answer is further down the page.)
Method 2: Straight, Then Diagonal
Another way to consider the knight move might be as a
combination of a one-square straight move, followed by a one-square diagonal
move, which I call the ‘straight-then-diagonal‘ method.
| a | b | c | d | e | f | g | h | ||
| 8 | 8 | ||||||||
| 7 | 7 | ||||||||
| 6 | 6 | ||||||||
| 5 | 5 | ||||||||
| 4 | 4 | ||||||||
| 3 | 3 | ||||||||
| 2 | 2 | ||||||||
| 1 | 1 | ||||||||
| a | b | c | d | e | f | g | h |
to figure out, since there’s only two steps to follow. Once again, we drop
a knight in the middle of the board on square ‘e4’ and we’re going to move
the ‘f6’ square.
Now let’s get out our red marker and show the available moves
using the straight-then-diagonal method.
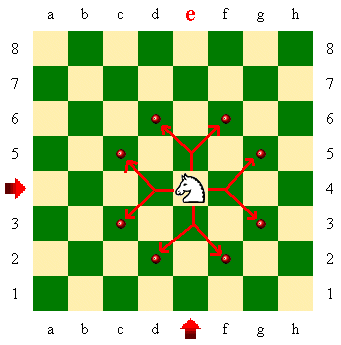
straight move along the row (rank) or column
(file) for one square, then makes a one square
diagonal move to arrive at its final destination. Straight, then
Diagonal.
To break it out into a two step operation, going from ‘e4′ to
f6’, we do the following:
| a | b | c | d | e | f | g | h | ||
| 8 | 8 | ||||||||
| 7 | 7 | ||||||||
| 6 | 6 | ||||||||
| 5 | 1 | 5 | |||||||
| 4 | |||||||||
| 3 | 3 | ||||||||
| 2 | 2 | ||||||||
| 1 | 1 | ||||||||
| a | b | c | d | f | g | h |
the knight moves forward straight along the file, just as if it was making
a one-square pawn move. But its not done yet…
| a | b | c | d | e | f | g | h | ||
| 8 | 8 | ||||||||
| 7 | 7 | ||||||||
| 6 | 2 | 6 | |||||||
| 5 | 1 | 5 | |||||||
| 4 | |||||||||
| 3 | 3 | ||||||||
| 2 | 2 | ||||||||
| 1 | 1 | ||||||||
| a | b | c | d | f | g | h |

the knight makes a one-square diagonal move to arrive at its final
destination on square ‘f6’.
Where Can a Knight Move?
Now, if you’re still having a tough time visualizing all the squares
that a knight can move to on the board, don’t worry about it; let’s see if we
can help.
| a | b | c | d | e | f | g | h | ||
| 8 | 8 | ||||||||
| 7 | 7 | ||||||||
| 6 | 6 | ||||||||
| 5 | 5 | ||||||||
| 4 | 4 | ||||||||
| 3 | 3 | ||||||||
| 2 | 2 | ||||||||
| 1 | 1 | ||||||||
| a | b | c | d | e | f | g | h |
of the board again on ‘e4’.
“Well yeah, Mr. Chessguy, but where all can the knight
move?” Well, let’s add some target dots. Remember, now, that a knight can
only move to an opposite-colored square from the one on which its sitting. That
is, THIS knight is sitting on a white square, so it can only move to
dark-colored squares.
| a | b | c | d | e | f | g | h | ||
| 8 | 8 | ||||||||
| 7 | 7 | ||||||||
| 6 | 6 | ||||||||
| 5 | 5 | ||||||||
| 4 | 4 | ||||||||
| 3 | 3 | ||||||||
| 2 | 2 | ||||||||
| 1 | 1 | ||||||||
| a | b | c | d | e | f | g | h |
Chessguy, but all those dots look like a lot to remember, as well.”
The Knight’s Circle of Influence
I agree, but it looks to me like the dots might form a circle.
Let’s see….
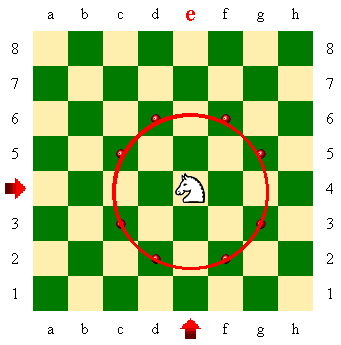
This is what I refer to as the knight’s “circle
of influence“. This one circle shows all of the
dark-colored squares to which this light-squared knight can move. Every
dark-colored square that the circle goes through is a square that can be
occupied by knight simply by moving it from ‘e4’.
Knight Moves in a More Complicated Position
Now let’s look at a more-complicated position, with a lot of
knights. Don’t worry, this won’t be tough.
| a | b | c | d | e | f | g | h | ||
| 8 | 8 | ||||||||
| 7 | 7 | ||||||||
| 6 | 6 | ||||||||
| 5 | 5 | ||||||||
| 4 | |||||||||
| 3 | 3 | ||||||||
| 2 | 2 | ||||||||
| 1 | 1 | ||||||||
| a | b | c | d | f | g | h |

knights might move? Let’s add a little help.
| a | b | c | d | e | f | g | h | ||
| 8 | 8 | ||||||||
| 7 | 7 | ||||||||
| 6 | 6 | ||||||||
| 5 | 5 | ||||||||
| 4 | |||||||||
| 3 | 3 | ||||||||
| 2 | 2 | ||||||||
| 1 | 1 | ||||||||
| a | b | c | d | f | g | h |
“Well, okay, what I see now is a whole
lot of dots, and some of them are right next to each other. Which knights
can go to which dots?”
All right, let’s draw the knights’ “circles of
influence” on the board.
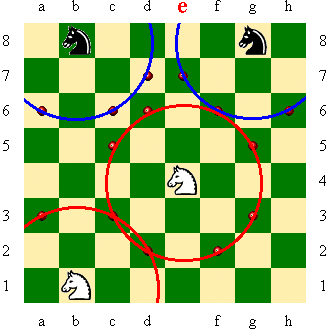
red circles, the black knights have blue circles.)
The white knight on light-colored square ‘e4’ can move
to any of dark squares ‘c5’, ‘d6’, ‘f6’, ‘g5’, ‘g3’, ‘f2’, ‘d2’, and ‘c3’,
as shown by the complete red circle. Dark squares ‘d2’
and ‘c3’ also come under the circle of influence from the white knight on
square ‘b1’. The ‘b1’ square knight’s partial circle covers the already
mentioned ‘d2’ and ‘c3’, and also ‘a3’.
The circle of influence for the black knight on ‘g8’
(towards the top right-hand corner of the board consists of squares ‘e7’,
‘f6’, and ‘h6’. (You might have already noticed that
‘f6’ is also covered by the white knight on ‘e4’.)
And remember that knights can only move to their
opposite-colored squares? Well, the knight sitting on dark square ‘b8’
(upper left) can
only move to light-colored squares ‘a6’, ‘c6’, and ‘d7’.
Why Knights Are Stronger Near the Center
That pretty much covers knight moves, but I want to point out something else,
related to the “circles of influence” position above. Notice that the
two black knights each cover 3 squares on the board, and each one has only a
partial circle. The white knight on ‘b1’ also only covers 3 squares and has a
circle fragment. The other white knight on square ‘e4’, however, covers 8
squares on the board, and enjoys a full and complete circle of influence. This
is because the knight is at the center of the board, rather than at the edge.
This illustrates a general rule of thumb that I want you to try to remember as
we go along, and that is knights that are closer to the center of the board will
generally be more valuable to you than knights that are stuck along the edges.