How to Castle in Chess: A Beginner's Guide for Kids

How to Castle in Chess: A Beginner’s Guide

Castling is one of the special moves in chess. It is the only move that lets you move two pieces, the king and a rook, as part of a single move.

There are two types of castling: kingside castling and queenside castling. This guide shows how each move works and explains the rules that determine when you can and cannot castle.

If you’re brand new to the board, start with how to set up a chessboard first, then come back to this lesson.

Castling at a Glance

To castle, move the king two squares toward the rook, then move that rook to the square immediately on the other side of the king.

  • The king must not have moved earlier in the game.
  • The rook used for castling must not have moved earlier in the game.
  • The king cannot be in check.
  • The king cannot castle into check.
  • The king cannot castle through a square that is under attack.

How to Castle Kingside

Okay, we’ve seen kingside castling before. And yes, there’s a
queenside castling (castling in the opposite direction with the other rook) as
well. So let’s look at the particulars of castling. We’ll set up a king and a
rook on the board by themselves.

a b c d e f g h
8               8
7             7
6               6
5               5
4               4
3               3
2               2
1             1
a b c d e f g h

Here we have the king and rook sitting on
their original squares, the same as when you first set up the pieces.
Castling involves two steps and two pieces. (It’s the only move in chess
where you’ll get to move two of your pieces at one time!) We’ll move the
king first, and then the rook. (Which is how you should do it, as well. In
fact, when you play tournaments, it’s a rule that you must move the king
first, and then the rook, in order to castle.)

Step 1: Move the King Two Squares

The first half of castling involves moving the king: 

a b c d e f g h
8               8
7             7
6               6
5               5
4               4
3               3
2           1   2
1         1
a b c d e f g h


Step 1: The
white king moves TWO squares towards the rook with which it intends to
castle. This is the only time in the game a king gets to move more than
one square at a time. 

Step 2: Move the Rook

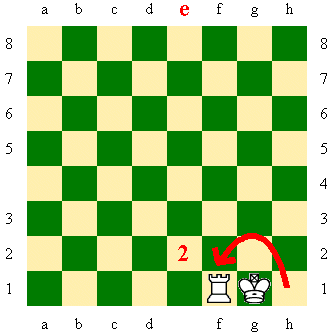
And for the second half of the move, the rook goes around to
the other side.

Kingside castling step 2 showing the rook moving to f1 after the king moves to g1

Step 2:
The rook hops over the king and takes its place on the other side of His
Majesty, sitting on the square right next to him.


How to Castle Queenside

Now we’ve gone over kingside castling, which involves the king
and the rook nearest to it on the right side of the board. But you’ve got two
rooks, haven’t you? The other rook is on what we call the ‘queenside’ of the
board, and there is such a thing as queenside castling, with the
king and the rook on the left-hand side (the ‘queenside’) of the board. Let’s look
at that.

a b c d e f g h
8                 8
7             7
6               6
5               5
              4
3               3
2               2
1           1
a b c d f g h
Queenside castling is a little different, but
not much. The only difference is the rook moves a little farther in
queenside castling.

Step 1: Move the King Two Squares

First we move the king:

a b c d e f g h
8               8
7               7
6               6
5               5
              4
3               3
2     1         2
1       1
a b c d f g h
Step 1:
As before, the king starts off the dance by moving two squares, but this
time he’s moving two squares to the left, rather than two squares to the
right.

Step 2: Move the Rook

Care to take a guess, now, as to where the rook will move to
complete the move?
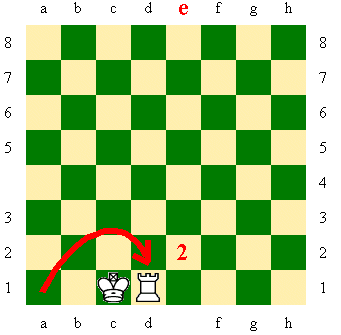
Queenside castling step 2 showing the rook moving to d1 after the king moves to c1 Step 2: That’s
right. The queenside rook (which can be called the ‘queen rook’) moves to
the opposite side of the king to sit on the square right next to it. 

The Rules for Castling

Basically, that’s it. Basically…. Yes, there are some other
rules to castling that control not so much as how you can castle, but whether if
you can castle at all or not. (Yeah, I know, there are always rules….) We’ll go
over them here:

Rule 1: The King Cannot Have Moved

a b c d e f g h
8       8
7   7
6             6
5             5
4             4
3             3
2 2
1       1
a b c d e f g h

Rule 1: If
the king has moved at all prior to castling, then it can NEVER castle at
any time during the game.

Here, for some reason that only he knows, white just
moved his king forward to square ‘e2’. White had not previously castled,
and that’s too bad, because now white can NEVER castle, because he’s
already moved his king once. Even if he moves his king back to square
‘e1’, he still can’t castle because he’s already moved his king. Black in
this position hasn’t moved his king yet, and can now go ahead and castle
on the kingside, thereby safeguarding his king and bring his rook into
play.

So, if you want to castle, don’t move your king
beforehand. On the other hand, if you don’t want  your opponent to
castle, try and force him to move HIS king!

Rule 2: The Rook Cannot Have Moved

Okay, we can’t move the king before castling, how about the
rooks?

a b c d e f g h
8         8
7   7
6           6
5           5
4             4
3         3
2   2
1           1
a b c d e f g h

Rule 2: If
the rook with which you wish to castle has moved at all, then you can
never castle WITH THAT ROOK during the game.

In this position, white moved his king rook from square
‘h1’ to ‘h2’. Now white can never castle on the kingside with this rook
again, EVEN IF HE MOVES THE ROOK BACK TO ‘h1’. Sorry, it’s too late. (Black
as we can see has already castled on HIS kingside, however.)

But all is not lost. Because the king has not yet moved,
and the QUEENSIDE ROOK ALSO HAS NOT MOVED, white CAN STILL
castle
on the queenside.

So if you can’t get your opponent to move his king early
on, maybe you can get him to move one or both of his rooks. (But that’s
really hard, and you’ve got better things to do anyway in the opening, as we’ll see later
on.) 

Now, even if you haven’t moved your king and rooks yet, there
still might be reasons why you can’t castle:

Rules 3 and 4: You Cannot Castle While in Check or Into Check

a b c d e f g h
8         X 8
7   7
6           6
5             5
4           4
3         3
2   2
1           1
a b c d e f g h

Rule 3: You
cannot castle when your king is in check. 

(Sorry, they just didn’t think it was very
sporting for you to be able to escape all your problems by castling out of
check.)

Here, black has just moved his bishop to square ‘b4’ and
placed white’s king into check. With his king in check, white now CANNOT
castle. But he IS in check, so he’s got to drop everything he’s doing and
get out of check, either by moving his king or (think about THIS!) moving
another of his own pieces into the path of the attacking bishop, such as
moving the pawn on square ‘c2’ ahead one square to ‘c3’. Set it up on a
board yourself to see what it looks like.

Rule 4: You cannot
castle into check.

And let’s look at black’s castling chances. Here, black
can’t castle on his kingside because the first half of the castling move
(taking the black king and moving two squares over from ‘e8’ to ‘g8’ where
the red ‘X‘ is) would place the king into
check from white’s bishop on square ‘c4’. (Follow the arrows from the
bishop to the ‘X‘ on ‘g8’ to see what I
mean.) Simply stated, you can’t move your king into check, even if you’re castling. The
king’s just too important for that. (There’s no reason in the world,
however, why black can’t castle queenside in this position, once its his
move again.)

Rule 5: You Cannot Castle Through Check

And there’s one more consideration to when you can and can’t
castle:

a b c d e f g h
8       X   8
7 7
6             6
5             5
4           4
3             3
2   2
1     X     1
a b c d e f g h

Rule 5:
You cannot castle through check.

Huh? Okay, what I mean is that if the castling move
takes the king across a square that is covered by your opponent’s piece,
then you cannot castle. I know; your king is just passing through, but it
doesn’t matter. The king is so important, it can’t even pass over a square
that’s covered by an enemy piece.

It’s easier to visualize than describe. Here, white
cannot castle to his queenside because the king would have to move over
square ‘d1’ (where the red ‘X‘ is) on its way
to ‘c1’. Square ‘d1’ is covered by the black bishop on ‘g4’. (Follow the
arrows from the black bishop on g4 to the ‘X‘
on ‘d1’.) The king would be castling through check, and
that’s not allowed. White CAN castle to his right in this position,
though, over to the kingside.

Similarly, black cannot castle kingside in this
position, because square ‘f8’ over which the king would pass is covered by
the white bishop on ‘b4’. (Follow the arrows to the red ‘X‘.)
There would be no problem, however, with black choosing to castle
queenside in this position, ending up on square c8.

Can You Castle More Than Once?

Oh, by the way, there’s one more thing. If you’ve castled once
already, and just happen to get your king back to its original square later on
in the game, don’t think that you can castle again with the other rook that’s
still sitting on its own square on the other side of the board. You can’t.
Sorry. One per customer per game, please.

Practice Castling

So, that’s castling. The move itself is simple, and there’s
some additional rules that control it. As you play more games, you’ll get the
hang of it to where it’ll be second nature. 

Keep Learning Chess

Once castling makes sense, keep practicing the move in real games and explore more beginner chess lessons from Kid Chess.

Explore Learn Chess
Try the Kid Chess App